Minimizing Database Calls

Tags

, , , , , , ,

I have been focusing a lot of attention on performance tuning AX over the last year.  The company I work for has now been live on AX 2012 R2 for about a year and a half and we’ve spent a lot of effort tuning indexes and re-writing code and processes to speed up our system.  Spending so much time thinking about performance has caused me to change the way I write and fix code so I figured I would share.

Outside of making sure you have good indexes for your tables, the biggest offender I’ve found for slow processes is unnecessary database calls.  I see it and have been guilty of writing it in code all the time.  You have a process that loops through records, evaluates some conditions, grabs related data if necessary and then performs some action.  The offender in this scenario is “grabs related date if necessary”.

It is really easy to write a basic query to start off with and then, in the middle of your process, grab more data.  AX 2012 makes it easy for you with Table::find() methods and by having the CreateNavigationPropertyMethods property on a table relation.  This allows a developer to grab a related table from an existing table buffer using a method call that matches the relation (e.g CustTable.DirPartyTable_FK()).  While this is incredibly useful, the danger with this approach is that it adds another database call to the process.

DatabaseCallJob

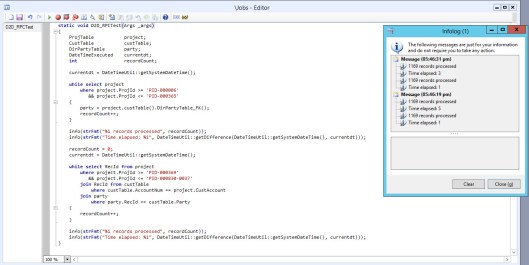
Examine the job above.  I have 2 while select statements that loop through the same number of records.  I have used different ranges so I could show times for cached and non-cached results.  The first loop grabs the project records and then during processing makes 2 more database calls to get the CustTable and then the DirPartyTable.  The second loop uses joins and a field list to minimize both the amount of data returned and the number of database calls.

I ran this process twice.  The infolog shows that the first loop took 5 seconds to run and the second loop took 1 second to run.  The second time I ran this process the first loop fell to 3 seconds because of database caching.  This means that the first loop takes 5 times longer to run when it’s calling the database and 3 times longer when its reading from the cache (a precision of seconds is probably minimizing this difference).  5 seconds doesn’t seem like a long time to process over 1100 records but there are a few things to consider.  This process isn’t doing anything but grabbing the records and this job was run in a stand-alone development environment.  The client, AOS and database are all on the same server and there is no one else using it except for me.  Imagine how much longer this could be if there were lots of users running processes in the system or if the components were separate and the network happened to be slow.

Each database call can add up to 2 remote procedure calls depending on where the code is running.  In this instance, my job is running on the client so the number of RPC’s is twice the number of database calls (1 from client to AOS and 1 from AOS to database).  The first loop has 2 RPCs for the while select, and then 2 (number of calls) X 2 (client and server) X 1169 (number of records) for a total of 4,678 RPCs and 2,339 database calls.  The second loop has 2 RPCs and 1 database call and the potential to give you just as much data as the first loop.  That’s a pretty crazy difference!

I now write a lot more X++ pseudo-SQL with joins when writing new code and changing existing processes.  The amount of time that can be saved during runtime far outweighs the extra time it takes to plan out your processes to grab all of the data that is needed the first time.


Push-AXModel custom PowerShell function

Tags

, , , , , , , , , , , , , , , , , ,

This is potentially the last of my PowerShell posts.  This function wraps up what I currently use in my environment to build and deploy for AX.  This function uses some of the same functions used by the Build-AXModel function as well as some of the functions that ship with AX and also the custom functions that have been added since the build post.

As with the Build-AXModel function, I will not be including this one in the module either.  I am hoping that most users will be able to use the function as-is to create a push process but some users will need to modify it to make it work for them and all users will need to modify the variables.  Please feel free to change this function to fit your needs.  I have built the template I have to fit mine, although I have added looping to certain function calls to try and make it as re-usable as possible.  You should add the function to your session using your profile as you’ve done for the build function.

The Push-AXModel custom PowerShell function takes 3 parameters:

  • ModelFile (The model file to push)
  • ConfigPath (Client configuration for the AX environment to push to)
  • VariablePath (Path to a file used to default the parameters/variables)

All 3 variables should be used, although you could specify both the ModelFile(s) and the ConfigPath in the Variable path file if you’d like.  I am not expecting another blog post explaining the variables file as all of the concepts that I used for the build variables will apply to this variable file as well.

This function can be found in Codeplex in the Standalone functions section.  There are 16 basic steps to my push:

  1. Stop the AOS
  2. Clean up unused default layer models using Clean-AXModels
  3. Import the model file(s) using Install-AXModel
  4. Start the AOS
  5. Install any hotfixes using Import-AXXPO
  6. Stop the AOS
  7. Compile the AOT using Start-AXBuildCompile
  8. Start the AOS
  9. Compile any individual items using Compile-AXXppNode
  10. Compile CIL using Compile-AXCIL
  11. Delete the old artifacts using Clean-AXArtifacts
  12. Sync the data dictionary using Sync-AXDB
  13. Refresh the services using Refresh-AXServices
  14. Deploy changes to ports using Refresh-AXAifPort
  15. Deploy reports using Publish-AXReport
  16. Restart the AOS

Install-AXModel is a function that is part of the AXUtilLib.Powershell module.  You should definitely check out the link and make sure that you understand what the Conflict parameter does.  Your specific environment may dictate that you change this value when importing your model(s).  There is also a NoOptimize parameter that can be used when importing multiple model files. I did not go this route as I only have one model but it may be worth looking into.

I did want to discuss my hotfix solution in step 5 very quickly.  I have added the ability to import .xpos in my build push as we very often discover issues during regression testing.  Depending on the issue, we create hotfixes instead of a new build.  I export these hotfixes out of TFS and add them to a “hotfixes” folder located in the same location as the model file being imported.  The Push-AXModel function will loop through and import all .xpos located in this folder, sorting by LastWriteTime.  Make sure you create the .xpos in the order that you want them imported.

Publish-AXReport is a function that is part of the Microsoft.Dynamics.AX.Framework.Management module.  The variables file is defaulting the ReportName value to the wildcard for “all”.  I personally don’t do this in my environments because we only have a handful of reports that have been modified/created so I just create an entry for each one.  It is faster to deploy the few indiviual reports that I have.  Since I also manage our builds, I can add new reports to the variable files in each environment if necessary.

I still have one manual process to accomplish when pushing my models.  I have no function for deploying cube changes I don’t currently have a strategy to accomplish this in PowerShell.  As we very rarely make cube changes, it hasn’t been a big issue.  There may be other push processes that are specific to your environment that you may need to automate as well.  If there are, I would be interested in hearing what they are and how you accomplished it.

One last thing, I have cleaned up all of the standalone functions in Codeplex.  The only standalone functions that are in there now are Build-AXModel and Push-AXModel.  Everything else is part of the module.


Clean-AXModel custom PowerShell function

Tags

, , , , , ,

The Clean-AXModel custom PowerShell function will allow you to clean up default AX layer models.  Custom AX models allow you to use Uninstall-AXModel from the AxUtilLib.Powershell module to remove them from your environment but the default layer models (e.g. ‘USR Model’, ‘VAR Model’) will throw an error if you try to delete them.  This is where Clean-AXModel will shine.

I use this function when preparing a non-production environment for a model push.  In my environment, we only develop in one layer/model.  It is possible that another developer has accidentally changed an object in another layer/model however.  Clean-AXModel ensures that the only code that exists in my pre-production environments is the code that I’m going to bring in with my model push.

The Clean-AXModel function takes between 3 and 6 parameters:

  • ConfigPath (Client configuration for the chosen AX environment)
  • Model (The AX model to clean)
  • TMPModel (The temporary model to move objects to.  Defaults to ‘TMP Model’)
  • Layer (The layer that holds the model to clean)
  • AXVersion (The AX version.  It defaults to 6.)
  • NoInstallMode (A switch parameter that stops AX from prompting you to recompile when you log in after modifying the AXModelStore)

This function can be found in Codeplex.  The steps of this function are:

  • Get the AX environment info using Get-AXConfig
  • Check to see if the model being cleaned has anything in it before cleaning it
  • Delete the TMPModel if it already exists
  • Move all objects from the model to clean into the TMPModel
  • Delete the TMPModel
  • Set “NoInstallMode” on the AX model database if the switch parameter was passed

I have updated the D2DDynamics module to version 1.0.5 with this function.  I have also modified the Send-Email function with this changeset.  I have fixed a bug that was brought up to me from a user regarding adding multiple “to” addresses to an email.  This should now work.

This function has only be run by me on the AOS server.  It has been tested using AX 2012 R2 CU6 and CU7 but I would expect this to work for any version of AX 2012.

Get-AXTFSCombinedXpo custom PowerShell Function

Tags

, , , , , , , , ,

The Get-AXTFSCombinedXpo custom PowerShell function is used for getting code out of TFS as an .xpo.  At my current job, we sometimes have to hotfix .xpos for builds.  I know that the trend is to move away from pushing .xpos but when it comes to hotfixes for builds, .xpos are significantly faster than creating another build and pushing a model.

We have a team dedicated to unit and regression testing and we regression test every model build before it is moved to production.  When we discover issues in the model build, we hotfix the build using .xpos so we can continue regression testing.

This PowerShell function uses both tf.exe and the TFS Power Tools to export the .xpo.  To use this function, you will need to run it on a server that has Visual Studio installed and connected/synched with TFS and have the TFS Power Tools installed.  Because of these requirements I run this from either my development server or from my development build server.

You will need to add some code to your profile as we’ve done for other functions.

ProfileAdd

The tf.exe reference should already exist in your profile for the TFS sync used by the build function.  The Microsoft.TeamFoundation.PowerShell reference is for the TFS Power Tools.

The Get-AXTFSCombinedXpo custom PowerShell function takes between 1-7 parameters:

  • Version (The TFS version to retrieve)
  • DateFrom (Used to set a start datetime to look up a range)
  • DateTo (Used to set an end datetime to look up a range)
  • OutputFile (The exported .xpo file)
  • TFSCollectionUrl (The URL used to connect to TFS)
  • TFSLocation (The location in TFS to get the files from)
  • VariablePath (Path to a file used to default the parameters/variables)

This function can be found in Codeplex.  The steps of this function are:

  • Load the variables if a VariablePath parameter is used
  • Get the TFS connection object
  • Create a temporary folder to hold the uncombined .xpos
  • Determine how to get the .xpos out of TFS based on the datetime parameters and the version
  • Loop through the files and save them as .xpos in the temporary folder location
  • Create the output file directory
  • Use CombineXPOs.exe to create the combined .xpo
  • Clean up the temporary folder and files

This function can be used to grab a single changeset, a range of changesets, a label version, or even the entire codebase.  I primarily use it to get a single changeset or a range of changesets.  Synching the TFS working folder is significantly faster than trying to grab a label version or the entire codebase with this function so I wouldn’t recommend using it for those purposes but it is able to if you want it to.

To get a range of changesets, use the date field information (datetime) of the TFS history to set the DateFrom and DateTo parameters.  Then use the latest changeset value in that range to set the Version parameter.  You can pass the DateFrom and DateTo as strings and the parameters will convert them to datetimes.  I have only tested the formatting of this using the en-us datetime format (M/d/yyyy h:mm:ss tt) so it is possible that you may run into issues if you are using another datetime format.  Please let me know if you experience any problems.

I am using this function with Visual Studio 2012, TFS 2012 and AX 2012 R2 CU7.  It has not been tested with other versions but may work with them anyway.

I am releasing this function as part of the D2DDynamics module (1.0.4) and as a standalone function at the current time.  I am determining whether or not I will remove the standalone functions that also exist in the module from Codeplex in the near future and will notify you through my blog if I do.


Refresh-AXAifPort custom PowerShell function

Tags

, , , , , , , ,

The Refresh-AXAifPort custom PowerShell function is very useful if you have customized AIF services.  It will allow you automatically push modifications to these services when you run it after Refresh-AXServices.

This is the first PowerShell function that I’ve published that requires AX code to work.  This function calls a custom Class\Static Method called D2DAutoRunHelper::AifPortRefresh().  This class automates the steps available from the AifInboundPort form.

AifInboundPortForm

The D2DAutoRunHelper class is available in Codeplex as an .xpo.  It must be imported into your environment for this PowerShell function to work.  The steps of the AifPortRefresh function are:

  • deactivates the port specified using the AIFPort parameter
  • removes all of the service class operations specified by the ServiceClass parameter
  • re-adds all existing operations minus the operations passed in the DisabledOperations parameter
  • disables then re-enables all fields minus the fields passed in the DisabledFields parameter
  • marks any fields required that are passed in the RequiredFields parameter
  • reactivates the port specified using the AIFPort parameter

Some things to be aware of:

  • you can’t disable a field that is required by the design of the service
  • you don’t need to mark required any fields that are required by the design of the service
  • for most services, you won’t need to pass DisabledOperations, DisabledFields or RequiredFields parameters as it will automatically deploy a service based on the design that exists in the AOT
  • the XPath value for fields should be used in the “Fields” parameters separated by commas (no spaces)

The Refresh-AXAifPort function takes between 1 and 12 parameters:

  • ConfigPath (Client configuration for the chosen AX environment)
  • LogFile (The value defaults to the temp folder but can be overridden if desired)
  • TimeOut (The value defaults to 30 minutes but can be overridden if desired)
  • AIFPort (The name of the AIF inbound port where the service is deployed)
  • ServiceClass (The name of the service class that is being exposed)
  • DisabledOperations (A comma delimited list of operations that aren’t exposed)
  • DisabledFields (A comma delimited list of fields that aren’t enabled)
  • RequiredFields (A comma delimited list of fields that are required)
  • SMTPServer (SMTP server to use to send the email)
  • MailMsg (Net.Mail.MailMessage object used to send the email)
  • AXVersion (The AX version.  It defaults to 6.)
  • VariablePath (Path to a file used to default the parameters/variables)

I use the VariablePath parameter the same way that I do in the other functions I’ve posted that use it.  This function can be found in Codeplex.  The steps of this function are:

  • Load the variables if a VariablePath parameter is used
  • Get the AX environment info using Get-AXConfig
  • Get the D2DAutoRunHelper::AifPortRefresh AutoRun xml using the Get-AXAutoRunXML function
  • Call the Start-AXAutoRun function to re-deploy the service

This function is being released as a stand-alone function as well as part of the 1.0.3 release of the D2DDynamics module.  The 1.0.3 release also includes a change to the Restore-AXDatabase function and Build-AXModel_Variables.ps1 to change the timeout parameter to use minutes like every other function in the module does.

This function should also only be run on the AOS server.  It has been tested using AX 2012 R2 CU7 but will probably work for other versions.

Refresh-AXServices custom PowerShell function

Tags

, , , , , , , , ,

Now that we have a working build, I’m going to be focusing on the functions that I use to manage my environment and code pushes. I will be releasing these functions as both stand-alone functions and to the D2DDynamics module.  You can integrate them into your environment either way.

The Refresh-AXServices custom PowerShell function allows you to automate service refresh functionality in AX.  This function looks just like all of the other functions that use Start-AXAutoRun.  It is a template you will see over and over again.

The process it is automating is navigating to the Services node in the AOT, expanding the node and then right clicking on a service and choosing Add-ins -> Register services.

RegisterServicesAlt

This process opens an AIF Services form that allows you to see information regarding your AX service classes.  It also has a button to allow you to refresh your services when there are code changes.  This is the process that is automated.

ServicesReresh

The Refresh-AXServices function takes between 1 and 7 parameters:

  • ConfigPath (Client configuration for the chosen AX environment)
  • LogFile (The value defaults to the temp folder but can be overridden if desired)
  • TimeOut (The value defaults to 30 minutes but can be overridden if desired)
  • SMTPServer (SMTP server to use to send the email)
  • MailMsg (Net.Mail.MailMessage object used to send the email)
  • AXVersion (The AX version.  It defaults to 6.)
  • VariablePath (Path to a file used to default the parameters/variables)

I use the VariablePath parameter the same way that I do in the other functions I’ve posted that use it.  This function can be found in Codeplex.  The steps of this function are:

  • Load the variables if a VariablePath parameter is used
  • Get the AX environment info using Get-AXConfig
  • Get the AIFServiceGenerationManager::registerServices AutoRun xml using the Get-AXAutoRunXML function
  • Call the Start-AXAutoRun function to refresh the services

This function uses the ability that the AutoRun process has of calling static methods in AX.  While this particular function is being used to call the AIFServiceGenerationManager::registerServices() static method, AutoRun allows you to call any static method inside of AX.  If you get really creative with it, you can build your own static methods inside of custom classes to automate non-static method processes inside of AX.  The AutoRun functionality is very powerful and can probably be used to automate just about any process inside of AX.

This function should also only be run on the AOS server.  It has been tested using AX 2012 R2 CU7 but will probably work for other versions.

Understanding the Build-AXModel function

Tags

, , , , , ,

I’m going to start off with how I set up TFS for a build.  I have my main code branch in TFS, D2D_AX_DEV, that is used for all of my development environments.  Each AX development environment has TFS setup and pointed to this code branch.  I have also set up a branch off of D2D_AX_DEV called D2D_AX_REL.  This is my release branch.  I merge everything into the release branch that is going to be included in the build.  I then point my build function to the release branch.

The Build-AXModel function is broken up into 5 sections:

  1. Outer section at the beginning and end that set up the variables passed through the parameters and that email start and completion of the function.
  2. Set up build variables: This section uses variables in the Build-AXModel_Variables.ps1 file that is passed in through the VariablePath parameter to set up the environment for the build and model export.
  3. Prep build environment:  This section restores the AX environment back to a vanilla instance for the build and gets TFS and the combined .xpo file ready.
  4. Import/Compile AX (Main build step): This section pushes the TFS code into the build environment and compiles/syncs everything and gets the environment ready for a model export.
  5. Export model: This section exports the model file into your build folders.

The individual steps and explanations for what they are doing can be found in my earlier posts.  I have done some things in my Build-AXModel_Variables.ps1 file to make this more of a generic process to be re-used however and I would like to clarify what I’m doing.

There are multiple places in my build function where I loop to allow functions to work on different layers and models (model creation, .xpo creation/import, label file import, VS Project import and model export).  In my original process this wasn’t necessary as I only build one model in one layer.  The way it is currently built however, allows for multiple layers and models.

I handle this looping process using foreach statements and ArrayLists in my variables.  I used ArrayList vs array as the behavior with ArrayLists was a lot more dependable when looping.  It is a simple construct.  I build variables for the individual parameters needed for a function call.  I then build an ArrayList to hold grouped variables for a function call that will allow me to loop through an ArrayList of my grouped ArrayLists and call the function multiple times.  My loops are only through the VAR layer and for my D2D model but you can easily add more variables for layers and models to these ArrayLists to allow multiple function calls.  Make sure you build your ArrayLists in the order in which you want to process the layers and models.

ArrayListEx

The area that is most likely to need customization to fit your specific build are the steps in the “Import/Compile AX” region.  You may need to change the order of the server/node compiles or change the server compile to a client compile.  You may also need to change the function used to import the VS Projects and add some node compiles if you have some complicated dependencies.

As I said in the blog post covering the function, I’m not planning on putting this function into the module because of the likelihood that you will need to modify it to fit your needs.  I’m hoping that some users will be able to use it out of the box but I’m sure there are some who will need to make changes.  The steps in my version of the function fit the current needs of my build process.

Build-AXModel custom PowerShell function

Tags

, , , , , , , , , , , , , , ,

I apologize for the extra week between posts.  It has been a lot of work to get this function ready to post.  I built the D2DDynamics PowerShell module using cleaned up functions that were based off of the original functions I used to create my build.  Even though I tested all of the functions as I built them, my actual build was still using my old functions.  Getting my new build ready required me to bring my module into my build environment and re-write and re-test my build.  I also wanted to get at least one build done in my environment using the new function before posting it.  Hence, the extra week.

I’m not going to get too in depth regarding the function this week.  I am making it available so people can look at it and try and get an idea of what I’m doing.  I will be covering the specifics of it in future posts.  Also, I will not be including it in the module.  It is possible that a large percentage of users will be able to use the function as-is to create a build but some users will need to modify it to make it work for them and all users will need to modify the variables.  You should add the function to your session using your profile.

I have also updated the D2DDynamics module to version 1.0.1.  This release includes some documentation changes, a new Comment parameter for the Sync-AXTFSWorkingFolder function and I’ve exposed the Send-Email function because I use it in the Build-AXModel function that isn’t part of the module.  To use the Build-AXModel function, you will need to download and setup the latest version of the module (1.0.1).

The Build-AXModel custom PowerShell function takes 3 parameters:

  • BuildNumber (The build identifier)
  • ConfigPath (Client configuration for the AX build environment)
  • VariablePath (Path to a file used to default the parameters/variables)

All 3 variables should be used, although you could specify the ConfigPath in the Variable path file if you’d like.  I have defaulted both values in the function that I use already to make my life simpler.  Feel free to do the same thing in the function that you use.  This function is not designed to be used “out-of-the-box”.  You can customize the defaults and you will need to customize the Build-AXModel_Variables file that is used for the VariablePath parameter for this function to work.  I will get into what/why/how to use the variables in a later post.  For now you can look at the 2 files (Function_Build-AXModel.ps1 and Build-AXModel_Variables.ps1) and get an idea for what is going on.

There are 15 basic steps to the build:

  1. Sync TFS and set the label using Sync-AXTFSWorkingFolder
  2. Stop the AOS
  3. Restore the build environment to vanilla using Restore-AXDatabase
  4. Create the new models
  5. Delete the old artifacts using Clean-AXArtifacts
  6. Start the AOS (Build environment is now clean and ready for the new build)
  7. Generate the combined .xpo files using Combine-AXXPO
  8. Import label files using Import-AXLabelFile
  9. Load the combined .xpo files using Import-AXXPO
  10. Compile and load the VS projects using Start-AXMSBuildImport
  11. Compile the AOT using Start-AXBuildCompile and Compile-AXXppNode
  12. Compile CIL using Compile-AXCIL
  13. Sync the data dictionary using Sync-AXDB
  14. Reload the AX artifacts using Clean-AXArtifacts (This step helps with label file issues when pushing the model)
  15. Export the model file

D2DDynamics custom PowerShell module

Tags

, , , , , , , , , , , , , , , , , , ,

The D2DDynamics custom PowerShell module is finally available in Codeplex.  The 1.0.0 version includes 15 exportable PowerShell functions and 3 internal helper functions.  They are:

The 3 internal functions are:

This module is dependent on the 0.3.5 release of the DynamicsAXCommunity PowerShell module among others.  There are also some variables that should be set up in your profile if you are planning on using the functions.  The profile that I use can be found in Codeplex at Source Code -> Powershell -> Profile -> Modules -> Microsoft.PowerShell_profile.ps1.  Please use this as a reference for setting up your own profile.

To install the module, copy the D2DDynamics folder to the module folder for PowerShell.  On my Server 2012 server, the location is “C:\Windows\System32\WindowsPowerShell\v1.0\Modules”.  After the module is there, you should be able to open PowerShell and add it with the Import-Module cmdlet.

Future posts will include the steps necessary to create a custom build process using the module as well as more functions that can be used for deploying your build to other environments.  Please let me know what you think of the module and if you find any problems with using the functions in your environments.

Import-AXVSProject custom PowerShell function

Tags

, , , , , , , , ,

The Import-AXVSProject function is the second of 2 functions to support more complicated Visual Studio project scenarios.  I have taken this approach from here.  I don’t personally use this approach in my build as my current environment doesn’t require it but this function along with my earlier post should allow a user that does have these complicated scenarios to import VS projects for a build.

This function uses a system class to import the VS project.  The AX SysAutoRun functionality allows users to call a static method of a class in AX.  The AX system class SysTreeNodeVSProject has a static method called importProject() that takes an argument of a VS project file and imports it into AX.

Using the Import-AXVSProject function in conjunction with the Compile-AXXppNode function will allow you to import VS projects and compile them in any order that you need to.  If you have projects that are dependent on AX code to compile correctly, you can compile the AOT or specific nodes of the AOT before importing and compiling the project.  If the AX code or another VS project is dependent on the VS project, you can change that order.  These functions allow you to import and compile in a manner that gives you control over order and saves time from a full AOT compile.

The Import-AXVSProject custom PowerShell function takes between 1-8 parameters:

  • ConfigPath (Client configuration for the chosen AX environment)
  • VSProject (The VS project to import)
  • LogFile (The logfile for SysAutoRun.  Has a default value so you only need to specify if you want to change the location.)
  • Timeout (The value defaults to 90 minutes but can be overridden if desired)
  • SMTPServer (SMTP server to use to send the email)
  • MailMsg (Net.Mail.MailMessage object used to send the email)
  • AXVersion (The AX version.  It defaults to 6.)
  • VariablePath (Path to a file used to default the parameters/variables)

This function can be found in Codeplex.  The steps of this function are:

  • Load the variables if a VariablePath parameter is used
  • Get the AX environment info using Get-AXConfig
  • Set up the AutoRun xml command
  • Get the AutoRun xml using the Get-AXAutoRunXML function
  • Call the Start-AXAutoRun function to compile the node
  • Send the success/fail message

This is the last function necessary to create an automated build process.  In the coming weeks I will be cleaning up my current posts to fit with some changes I have made to the existing functions and I will post a blog about putting these functions together to allow you to automate your build.  I will also be releasing a module to Codeplex in the next month that will have all of the functions packaged up for easy deployment.